Replace Chrome OS with Linux on Acer Chromebook 15
I recently replaced the Chrome OS with Arch Linux on my new Acer Chromebook 15 (model CG5-571), writing down the first post on Arch Linux to better explain how I’ve done it and the reason behind every steps.
There’s another way to run Linux with Chrome OS using Crouton. It’s less risky and you don’t need to worry about losing warranty of your Chrombook, check it out if you want the simplest setup, but what I wanted is a real system running on its own.
Prerequisites
Your Chromebook should have Intel inside, otherwise you can stop here.
Basic idea
In a nutshell, what’s happening is you are going to replace part or all of the BIOS firmware to make it support boot another system (Linux in this case).
Chrombooks are not created equal
Chromebooks feel like a simple idea implemented badly, with all the different models, generations from different manufacturer 1, the first thing you need to find out is what type of BIOS in your Chromebook.
Regarding to BIOS, there are four possible situations, in two categories:
- You already have SeaBIOS from the “Leagcy boot” feature, then you got all your need to boot another system.
- Normally you need to change at least part of your BIOS, depend on your model, there are three posiible options.
- RW_LEGACY: in this case, SeaBIOS can be written to a special section in BIOS only, the ChromeOS part can be kept intact.
- BOOT_STUB: this also only changes part of BIOS, but it does affect the native BIOS part
- FULL ROM: this case means you need to wipe out native BIOS, replace it with SeaBIOS
Good new is, you get covered for updating BIOS, there’s a script making the process automated.
Write protection, the scary part
First thing to know is all chromebook has the write protection to prevent you change the BIOS firmware, and break it might mean lose your warranty, if anything goes wrong, it’ll be on you.
Do you really need disable it?
This depends on your BIOS type again, if you have the legacy boot or RW_LEGACY section available, you don’t need touch the write protection to use SeaBIOS, but you do need if you want to make SeaBIOS to be the default one. While if your BIOS is the other two cases, then you have to disable the write protection in order to update your BIOS.
How the write protection works?
Write protection has two parts: hardware protection and software protection.
- Hardware protection is a on actual circuit of your motherboard, it disables a specific register (yes the software protection) to be written. Depend on your model, it could be a screw or a switch. You need to find out where it is for your chromebook, for screw, the general rule is looking for the biggest screw on your motherboard, not seems supporting anything, and there’s some metal section underneath it.
- Software protection is a special register which indicate whether and where the data in BIOS is been protected.
So, how to disable it?
- Remove the hardware protection, take out the screw, press the switch or short the jumper.
- In ChromeOS shell, run a command to disable software protection.
- Make changes to your BIOS.
- Reenable software protection.
- Reenable hardware protection.
By putting back the protection, you can avoid the risk of something bad happen to you BIOS later and make your chrombook become brick.
Now you shold have a good idea about what I’m doing in the later step by step part. You can read through the Arch wiki page and John Lewis website to find out more details.
Step by step on Acer Chromebook 15 (cb5-571)
1. Disable hardware write protection
Although this chromebook has a RW_LEGACY on BIOS, I don’t have to mess with write protection, but I do want to make SeaBIOS to be the default one. The protection is a screw on motherboard, if you remove the bottom panel, it basically looks like this, the highlighted circle is the screw.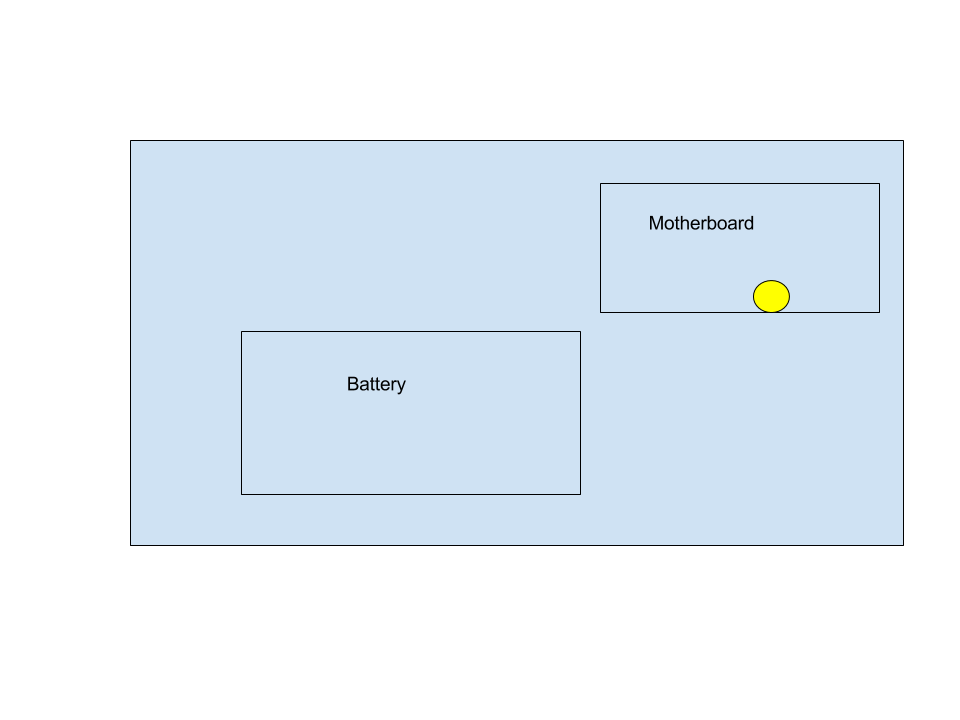
2. Login to chrome book in developer mode
This is something not mentioned in previous part, but it’s straightforward engough. Chromebook has a developer mode, which provide a sudo shell so we can run the command in root previledge. On my chromebook, the step to go into it are:
- Use Esc + F3 (refresh) + power button start computer to recover mode
- Press ctrl + D, and there will be some message let you wait, then you are in 3. Press ctrl + alt + F2 to get a login prompt, then login as chronos with no password. Or login to ChromeOS normmaly, then use ctrl + alt + T to open a shell
3. Run the johnlewis script to write SeaBIOS
As Simple as running following command, without sudo previledge
1 | cd; rm -f flash_chromebook_rom.sh; curl -O https://johnlewis.ie/flash_chromebook_rom.sh; sudo -E bash flash_chromebook_rom.sh |
4. Set Boot flag in shell to support boot SeaBIOS and usb
This is aslo done with a bash command, it will enable the legacy mode BIOS and boot system from usb.
1 | sudo crossystem dev_boot_usb=1 dev_boot_legacy=1 |
You might notice the write protection not been disabled till this step
Now the chromebook can be booted into SeaBIOS and boot from usb to install Linux normally. In startup, you can use ctrl + L to switch using SeaBIOS, the default BIOS is chrome one (And you can use ctrl + D to use it, you don’t need at this point, but later if you switch default BIOS to SeaBIOS)
4. Disable softeware write protection
You can run the command
1 | sudo flashrom --wp-disable |
to disable the software write protection, and look up the status by running
1 | sudo flashrom --wp-status |
The output should say write protection has been disabled
5. Set SeaBIOS to be the default BIOS
This is done by setting flags of BIOS, ChromeOS also comes with a script to do it set_gbb_flags.sh, on my chromebook it’s not in PATH, I need to use the absolute path /usr/share/vboot/bin/set_gbb_flags.sh
Run it direcly will out put all flags
1 | sudo /usr/share/vboot/bin/set_gbb_flags.sh |
The flags we are going to set are:
1 | GBB_FLAG_DEV_SCREEN_SHORT_DELAY 0x00000001 |
From the name you can tell it’s setting BIOS to start in DEV mode, and make BOOT_LEGACY to be default, also it’s showing a short delay screen. To set these flags, running
1 | sudo /usr/share/vboot/bin/set_gbb_flags.sh 0x489 |
You can see 489 is the sum of the four flags
Then as mentioned before, it’s safer to put write protection back
1 | sudo flashrom --wp-enable |
6. Reboot to SeaBIOS
Now you are ready to reboot, and it’ll default to SeaBIOS. You might want to put the hardware write protection screw back before you go into SeaBIOS.
In SeaBIOS, you can use Esc button to show boot menu, and if you insert an USB stick, it’ll show as a boot option. There’s a last trick, SeaBIOS will give a 100ms delay to wait USB declare itself to bus, the time is decided based on specification, but some USB stick could take longer than that to make bus know it’s there, in that case you can’t see the USB boot option. It happend to me at my first try, and I tried to use another USB stick which works.
From here you can enjoy the fun Linux installation part.
1 See https://wiki.archlinux.org/index.php/Chrome_OS_devices/Chromebook#Hardware_Comparisons ↩